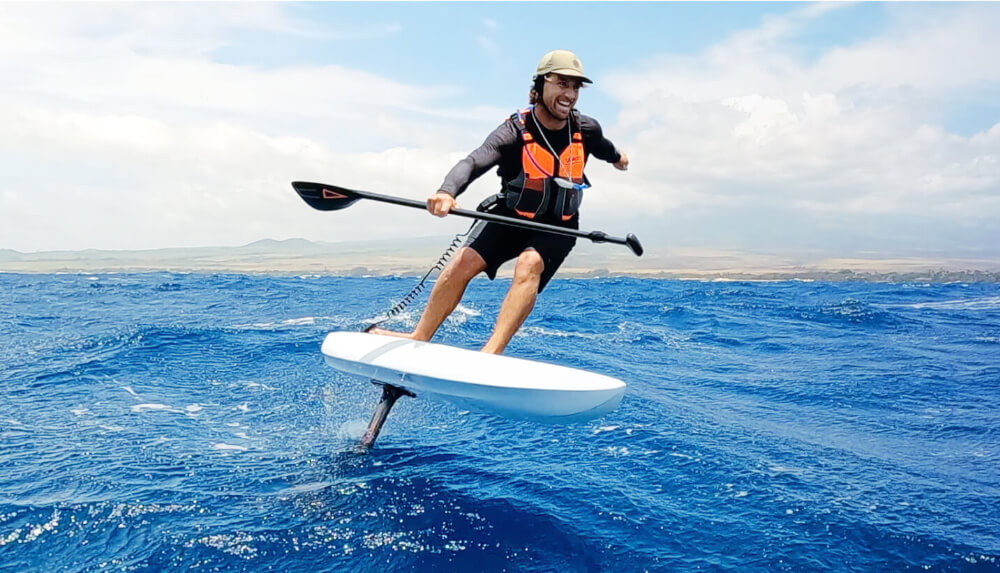
Downwind SUP Foiling Guide
Welcome to the “Downwind Journey”. Sometimes it is difficult to describe what downwinding is to others but more often it is even harder to curb your enthusiasm for this very new sport. Many riders often say that it is the journey that makes this so much fun. In my opinion, the term “downwind foil brained” is very true so be careful when you share your excitement with your family and friends. The journey takes many important steps and offers no shortcuts. We put together a very short guide with 9 basic sections that all downwind riders should master. Know that downwind SUP foiling takes you places far from the shore, so safety is very important. Just like with other high adventure sports, know your limitations and take care of your body and mind so you can enjoy this sport for years to come.
The 9 different sections are organized in a timeline we recommend taking. You can sometimes jump forward but know that getting excited may sometimes result in regressing back with your skills. For example, the wrong size paddle or extremely long initial run may result in elbow or shoulder injury that may take several months to heal. There are tools like FoilDrive to make your journey a little more efficient, but these do not let you skip any parts. The DW journey is a summary of time and effort that you put into training. Training regularly in good conditions offers the only opportunity to speed up the journey. Places like the Columbia River Gorge, Puerto Rico or Hawaii offer excellent conditions during specific seasons. In our Downwind Conditions section, we talk about how to read your local forecast and what to look for in good downwind conditions.
Selecting the wrong equipment makes it really hard to learn so consider what other successful riders use in your area and ask them about their journey. We have tried 6 or more different brands of downwind specific foils, boards and paddles before settling on our specific brands. We share this in the Equipment section.
The Paddle Up section includes some high-level tips on how to recognize the timing, how to start learning the correct technique and lists all the options that you may have to practice this. Although it is very important to paddle up, you may not have to be able to do it in flat water. Being able to paddle up in bumpy conditions is somewhat different and physically less demanding.
Reading the ocean energy is the most important skill that will keep you flying over the water. This is also what makes this sport so much fun. As you master it, your flow through the water will connect your mind with it and you will become one. The feeling of achieving this state is very hard to describe. Luckily, we offer many tools on how to learn this most fun part of this journey. You can use several tools to master this very important part.
The logistics of setting up rides can be daunting, but we were able to find some shortcuts that we would like to share with you in this section. Advanced Equipment talks about a variety of options that you will have once you become proficient and complete your first 5-10 dry runs in your local bay, river or lake area.
1. Downwind Conditions
The best places to learn downwind are lakes, bays or wide rivers with consistent wind over several days in a row. This will allow for repetition, and you will progress much faster. Once you master your short bay/river runs you can move to short runs in light ocean or Gulf areas where you have to tackle not only wind bumps but also cross chop coming from longer period ocean swells.
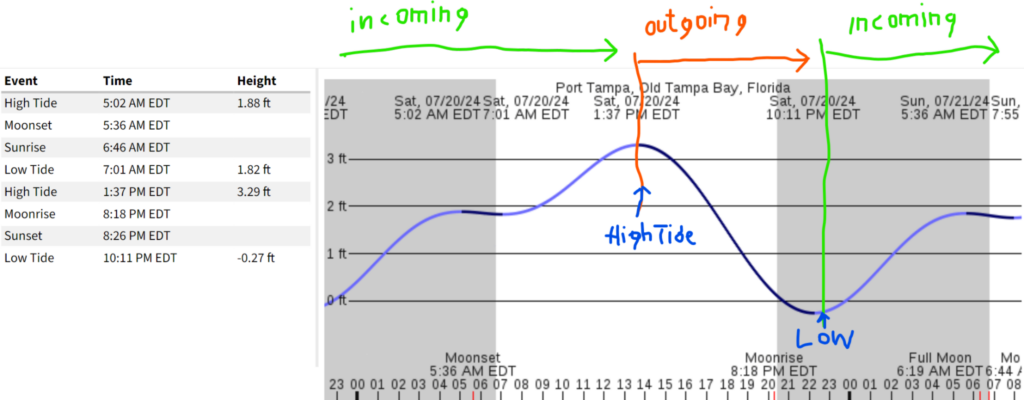
Look for inlets or bay areas and consider your tides. The “OPPOSING” tide to the wind direction makes the waves stand up more and generates more energy in the water making it easier to pop up on foil.
How to read your local tide: Outgoing tide is when water flows away from the bay or beach areas towards the sea or ocean. Incoming tide is when water flows into the bay area and water level rises.
How to read your local ocean buoy: Although your local buoy offers wave height and direction, the most important information is the period range. The range shows the spread of the ocean swells along with wind bumps that are usually traveling in different directions. The greater the blue area to its side is, the messier the conditions will be at your run. In the first example, wind bumps are spread from South to EastSouthEast. The closer to the center of the range, the shorter space will be between period waves. If the period increases past 8-10 seconds, it will be difficult to catch such a fast rolling ocean swell with your downwind board. The right side graphic shows very good NE conditions with minimal spread and relatively short 3-4 second period.


Charts are courtesy of https://cdip.ucsd.edu/m/products/?stn=134p1¶m=waveHs
1.1. First Training Ground
Once you master paddling straight and balancing your board on flat water, small inlets with sandbars can be excellent “First Training Ground” for endless practice. Meet up with your buddy, paddle out for 10 minutes, try to catch a small slightly breaking bump, and repeat. An example of this training ground is Upham Beach in Pinellas county. The bumps are great on NW wind or NW ocean ground swell.

1.2. Second Training Ground
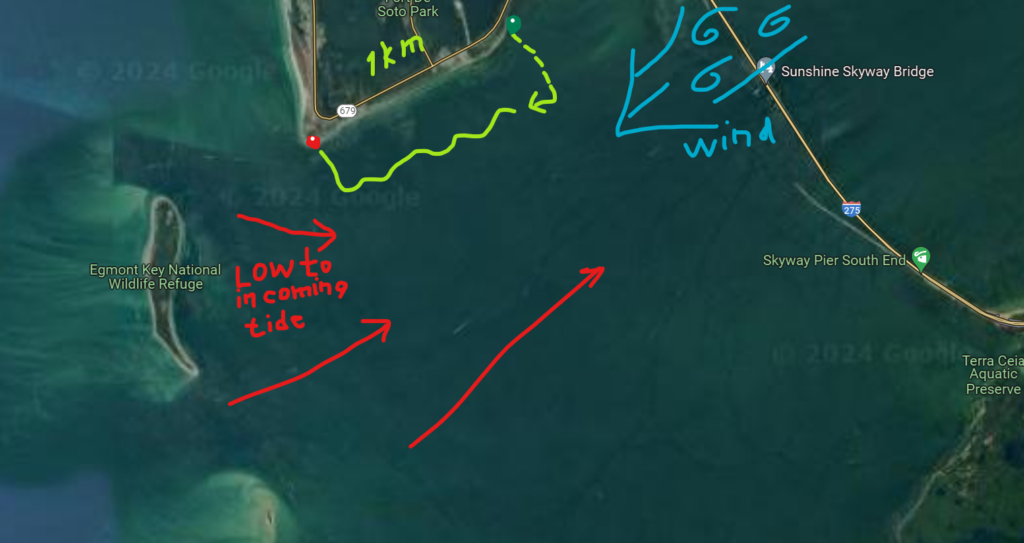
Once you advance in your paddle up and are consistently getting on foil, move to a “Second Training Ground” area with a maximum of 1-2 Km run where you can walk or paddle back to the starting point. An example of such a 2nd Training Ground is Brent’s Run at Ft. Desoto State Park. It works well with overnight 14-16 kt NE or ENE winds and opposing incoming or steady tide into the Tampa Bay area. Always ride with your buddy when trying a new area.
1.3. Columbia River Gorge
Columbia River Gorge offers an excellent learning ground for advanced beginners to intermediate riders. Hood River has a great downwind community and some of the premium water sports stores like Big Winds even organize downwind buses to assist with the logistics. Spring Creek park on Lower Columbia River (“Hatchery”) is located on the Washington side of the river about 2 miles West of Hood River town. The river current generally flows opposite to the strong wind and creates ideal size and steepness bumps for easy take off under very special repeatable conditions. After you paddle up and make a short run, you can simply float back up the river with the current and repeat another paddle up within a few minutes of the first one. This makes for an ideal recovery period between your attempts and increases the learning curve greatly.

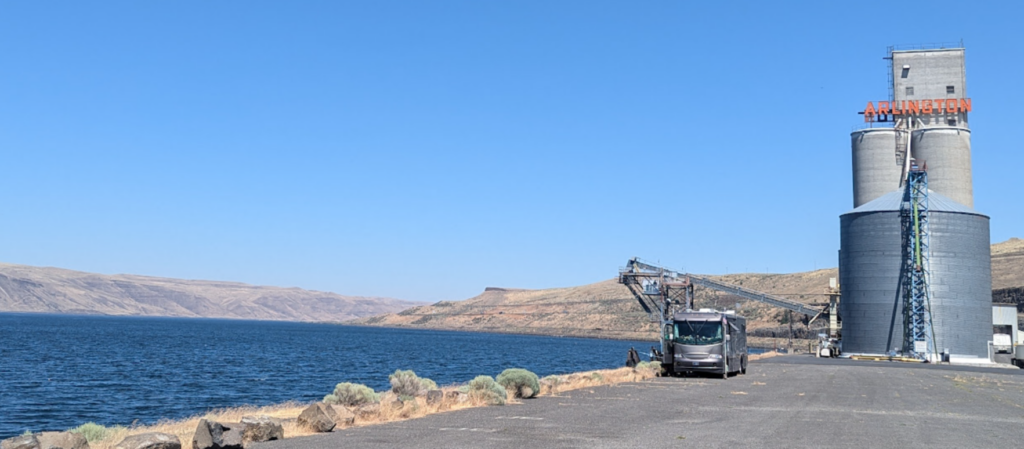
Once you graduate from Hatchery, Columbia River Gorge offers many other more advanced spots for your downwind journey like Arlington, Stevenson, Viento, Rufus and many others. Please check with the local shop or The Swell Riders – Downwind Foiling FB Group for more details.
Typical Hood River Forecast:
Mt. Hood snow and Gorge wind forecast | The Gorge is my Gym

2. Foil Equipment and your stance
Your board and foil choice is so much more critical than you think. It is important to point out that the initial idea of the narrow DW board design came from Dave Kalama who designed the original Barracuda downwind boards. The Barracudas are still the best boards on the market and are leading the charge in design updates with their new models. In 2023, many new boards came to market from pretty much all foil and board manufacturers. Some manufacturers got it right with their initial release, but most version 2 boards released in 2024 are much better. There are 5 major things to decide: hull shape, volume, length, width, and color.
2.1. Volume
Beginner and heavier riders over 75kg: Your weight converted to KG * 1.45 = Amount of volume of your board in liters
Advanced and lighter rider under 70kg: Your weight converted to KG * 1.3 = Amount of volume of your board in liters
2.2. Width
Beginner: 20 – 22-inch-wide boards (anything past 22 wide will hinder your progress)
Intermediate to Advanced: 19 – 20-inch-wide boards (any narrower than 19 inch will only be slightly faster)
Performance: 16 – 18-inch-wide boards (intended for larger ocean conditions with faster swells)
2.3. Length
An average rider will choose the board length based on the volume of the board per their weight. Such boards range from 7’4 to about 8’4. For most short and steep bay or lake conditions, the length of 7’-8’ is the maximum and seems to work well. The longer length over 8’10 or 9’ gives the board more balance in general. Most boards past 8-ft length are very narrow and intended for riding in faster big ocean conditions.
2.4. Hull Shape
There are two major categories of downwind board shapes: Planning-flat surface hull and displacement-round bottom hull. It is important to know the difference between these boards.
Planning-flat surface hull features:
- Slightly slower than displacement hulls initially but faster once you get on plane
- Great balance not only for beginners but also in messy conditions.
- Sunova, Naish, Kalama Barracuda, Amos Sultan
Displacement-round bottom hull features:
- Fast through the initial stages of paddle up
- Get balance from the length and are generally longer
- Used for bigger conditions where initial speed of paddle up is important
- User with smaller foils where initial speed of paddle up is important
- Very unstable and difficult to paddle standing in messy ocean or cross chop conditions
- Very hard to balance while standing and hard to put power to your paddle
Examples: KT Drangonfly v1, KT Drangonfly Crossing, Amos Bullet

2.5. Your Stance
Your stance on your board is very important. Many riders incorrectly think that you should stand over your mast while it is more important to straddle the center of lift of your foil system. Each foil brand, each foil size and stabilizer types are different. Some foils are positioned further away from the mast, and some have a very short fuselage. The general rule is that the center of lift of your foil system is roughly 30% into your front foil or where the foil is thickest. You can use a simple lifting test by placing the palm of your hand under this center of lift to estimate if your board setup feels balanced. If the foil is in the right position, the board should feel balanced and does not tip forward or back.
Some boards are made with short tracks which are further back and were intended for specific foil brands. The original Kalama Barracuda, Axis and Naish boards are good examples of this. Most boards made in 2024 have either 16 inch or larger tracks that accommodate all foil systems. Some manufacturers like Armstrong use a slight 1-degree rake in their system to lift the nose of the board. The important thing to know is that the rake is only built into their mast so the board tracks are parallel to the board’s deck and therefore can be used with any other foil system.


Once you balance your board with the center of lift example, you will be able to place the mast and foil on your board. To estimate your foot placement, it is a good idea to mark the center of foil lift on the top of your board so you can see it. You can place masking tape or simply mark your board with permanent marker. Your belly button or center of your hips is also your center of gravity and should be directly over the center of lift. Marking your board with the center of lift will help to shuffle your feet to the correct position. Your feet can face forward or both point to the outside rail according to your preference but it is most important that both are centered along the same center of lift. Most riders experience terrible back leg burn out. Such a condition is caused by standing too far forward and having your front leg straight. Not only this puts the entire system off balance and results in nose dives, but it puts most of your body weight on your back leg resulting in early fatigue. Many riders constantly adjust their foot positioning during the ride so it is a good practice to get used to it.
3. Safety and Safety Equipment (Garmin Sharing, WhatsApp, InReach, Phone)
Weather conditions can change quickly or equipment can fail during your downwind run. Try to think of potential scenarios and how you would solve them.
- Sudden side offshore wind with afternoon storm.
- Came off foil in strong rip current and floating away from the beach.
- Broken paddle by accidentally hitting foil when paddling up in waves 1 mile offshore.
- Broken leash and board floating away faster than you can swim to it.
- Loose screw in fuselage to mast connection or mast plate resulting in wobble.
These are just a few but all these can be easily solved if you prepare.
3.1. Personal Floatation Devices and Tools to Survive
In many beach areas, personal floatation devices (PFDs) are required for SUP paddling outside of lifeguard designated areas. For any downwind runs, PFDs are a required must-have so do not forget it in your car. You can easily slip off your board in wave condition and hit your chest or head on the board or even foil. Hypothermia can set in within a couple hours of floating without your board even in warm waters of Florida without your board. Here are a couple of options based on your budget. Vest shaped PFDs also provide a good option for storing your hydration pack and have many pockets for energy bars and other safety items like whistles, spare wrench, phone or radio. Many DW riders use the Vaikobi V3 Ocean Racing PFD in yellow/grey or orange /bright which has a zipper on the front and two side pockets. We pack a 1.5 L hydration bladder and a pair of swimming paddles which store easily in the sale back pocket as the bladder. One front pocket is dedicated to a phone and rust proof T30 and T40 wrench. Phone goes in the Seattle Sports E-merse NEO XL or Pelican IP98 case. Both phone and wrench are attached to a PFD strap. The other pocket has UV lip balm, your food and whistle.


3.2. Paddle Replacement
Swimming paddles are easy to carry for longer runs and store easily in the back of your PDF. These can be used if you break your paddle accidentally and will tremendously speed up the return journey to the shore. Some maybe even able to paddle up on foil with these in small bumps.

3.3. Parawing, PocketWing and Body-drag with Hand Wing

When downwinding with your hand wing, make sure to learn the proper technique of how to body drag back to your board or to shore in light wind. Your wing leading edge should be in the water and the tail of your wing should catch some wind to propel you to your downwind destination.
Some more recent developments in downwind specific handwings can also assist as a great safety device. Cloud iX Anchor device is a more modern leash replacement for your handwing. When you initially ride downwind with your hand wing, you may be able to drop your wing safely into the shore break with the leach anchor device and focus on getting yourself to the shore on your board safely. Your wing will get pushed to the shore safely on its own. Other new arrivals are the BRM Makiko parawing and Five’O Watersports Pocket Wing. Both wings are very small to store in a waist pocket and can be used in place of your paddle.

3.4. Energy and Hydration
Proper energy intake and hydration during downwind runs is a key to success. Paddle ups and pumping across waves during your downwind run is a high intensity exercise that depletes the energy store of your body very quickly. Ensure to hydrate and eat simple carbohydrates before your planned run. Even drinking your gatorade bottle in your car on the way to the beach is a better option than going out thirsty. Know that your body will last about 1 hr on water without any hydration in your Vaikobi. Small fatigue will start once you deplete your natural body hydration and energy. You will start making mistakes that will cost you more energy. If you start feeling thirsty or hungry for more energy it is too late. It is always better to come to the shore if you feel tired. Dates, figs, applesauce packs and energy bars are good sources of energy when you are on the water for extended periods of time.
4. The Paddle Up
4.1. Basic paddle skills
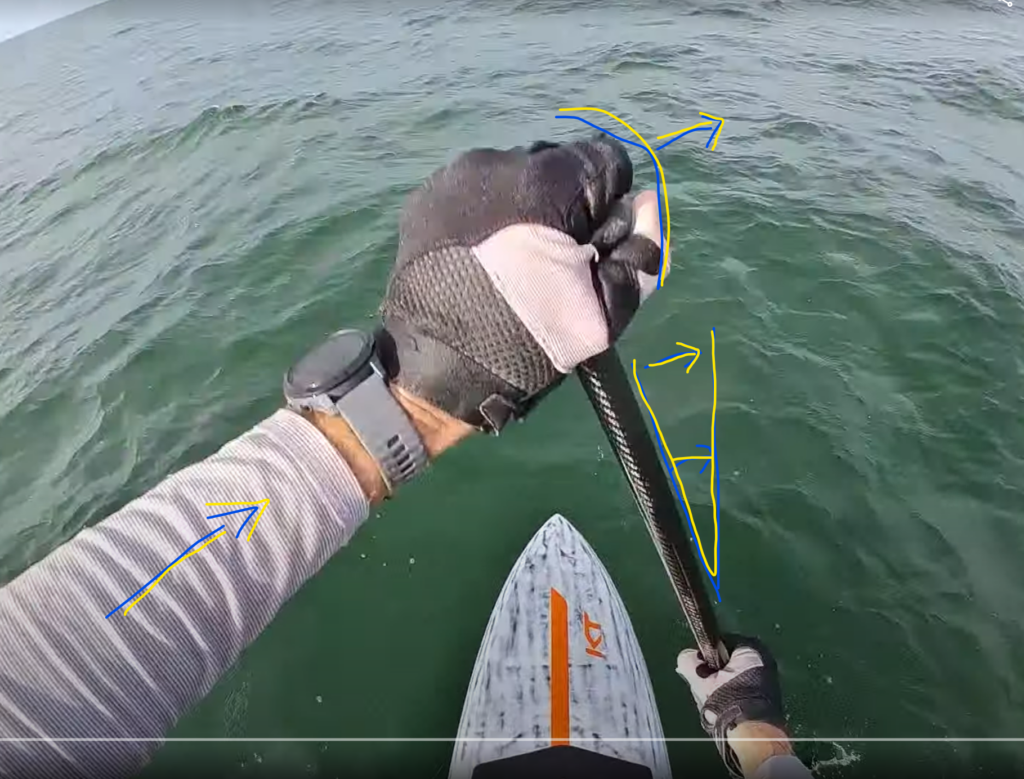
To paddle straight simply insert your paddle at the very front of your board and move it parallel to the stringer of the board toward your front foot. The insert of the paddle blade should not have any splash around it. The shaft of your paddle should be inserted at 90 degrees to the water. To achieve this, rotate your upper body and your upper shoulder towards the top of the paddle. Your upper hand should be right in the front of your forehead. Many beginners can’t paddle straight and the incorrect shaft angle is one of the main two reasons. The second reason is the length of the paddle stroke. Your normal stroke length should only extend from the nose of your board to the tips of your front foot. If the paddle continues past your feet it will not only turn your board but will be detrimental to your paddle up. Short and explosive stroke with high cadence is the correct technique. J-stroke is a type of stroke that starts slightly to the side of the nose of your board and can help to steer your board this direction or can allow for regaining balance if your board starts to lean under the front foot side. It is important to still keep your paddle at 90 degrees angle even with J-stroke. You should see the blade of your paddle coming to your front foot and extended bottom hand as shown in the picture here.

4.2. Basics of your stance during paddle up

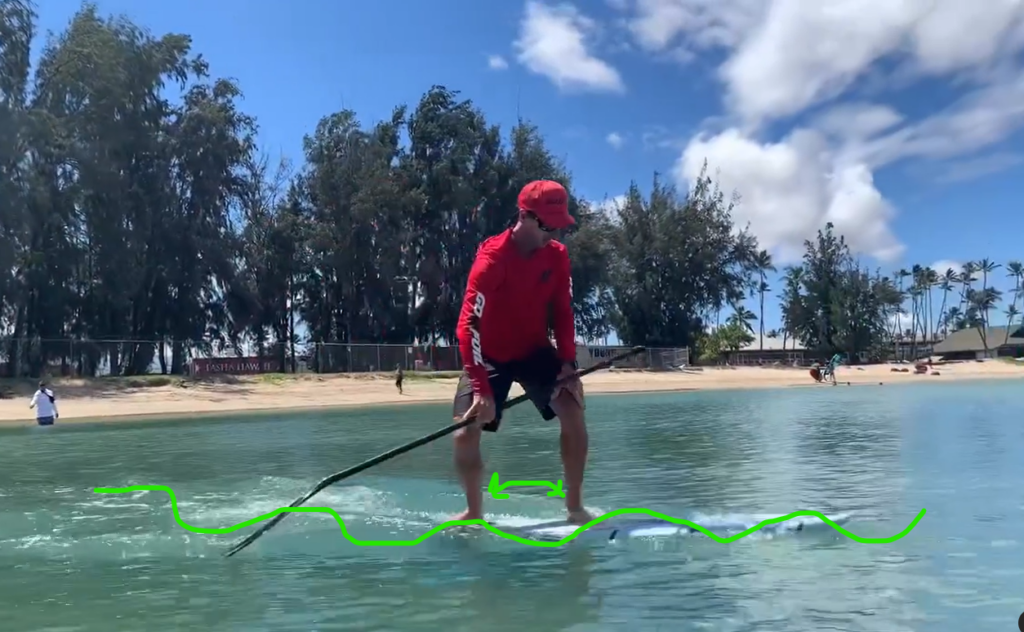
Now we will discuss how your body should look from the side view. Your paddle shaft should have a positive angle at the beginning of the stroke when you insert the blade in the water at the nose of your board. “Positive Angle Shaft” means that your bottom hand must extend further than your top hand. The blade continues down under your board but starts to come out very soon at the toes of your front foot. See the green and blue circular arrows in the picture to the side.
Try to have a friend take a side view picture of you when paddling to see if your posture and shaft angle is correct. If the shaft angle is not positive try these suggestions. Straighten your bottom hand completely and move it up slightly up the shaft of your paddle. You can also bring your upper hand closer to your forehead. The correct body position can not only affect the shaft placement but also the success rate of your paddle up. Beginners as well as intermediate riders sometimes place their hand too far down because it feels like you can put more weight on the paddle and pull harder. This often results in crouching or squating down too low which in turn pushes your hips, your center of gravity, back behind your heels. The weight of your hips is extremely important and should be just between your feet and over your front foil to keep your board even or only slightly nose up. If you crouch or squat down, move your hips back, you will ultimately put more weight on the back of the board and stall your paddle up effort. The most successful technique is to keep your body straight and only lean forward at your ankles, front knee over your toes with a very short and high cadence paddle stroke. See the side image for comparison and notice the height of the board nose in both pictures.


4.3. Porpoising Your Board and Body Rhythm
This is what we do to warm up at pop up practice or when we initially start going downwind. To porpoise is little like a sea-saw or rocking your board forward and back with the waves coming under you. It helps you to learn the timing and develops a good feel for when to start your paddle up.
First learn to porpoise your board and foil in flat water. Your body weight should be mostly on the front foot. Take a couple strokes to get moving, brace with the paddle then stop paddling. Now pump the tail of your board with your back foot and front with your front foot by using the buoyancy of your board. Concentrate on lifting your heel to allow the tail to pop up slightly.
Add your top hand on your front knee while porpoising your board and foil. This will help you line up your stance. Your head and shoulder should be in line with your front knee. Focus on keeping the board moving forward and level from rail to rail.
Lastly add short strokes with your paddle while porpoising. Try to gradually increase your speed while keeping good form. Try to go ONLY at 20-30% of your power and see if you can do 15-20 strokes while keeping your technique at 100%.
Once you get these drills down, it is about speeding things up. Start at 20% for the first 5 stokes, go to 40% for next 5-7 stokes while keeping your board relatively flat that add more speed but only if you feel that you have good balance and speed. You’ll have a very good chance of popping up.
4.4. How to grip your paddle and paddle length
Average paddle length should be slightly higher than your height. Maybe 1-2 inches over your head. Place your paddle under your arm and mark the lowest point where you want to hold your paddle. Your bottom hand should never be any lower than this mark. As you paddle up, you are rising out of the water and it is necessary to learn to move your bottom hand from this position up the shaft towards the upper hand. Moving your bottom hand will extend your paddle lower and allow for much better catch at the final critical stage of your pop up.
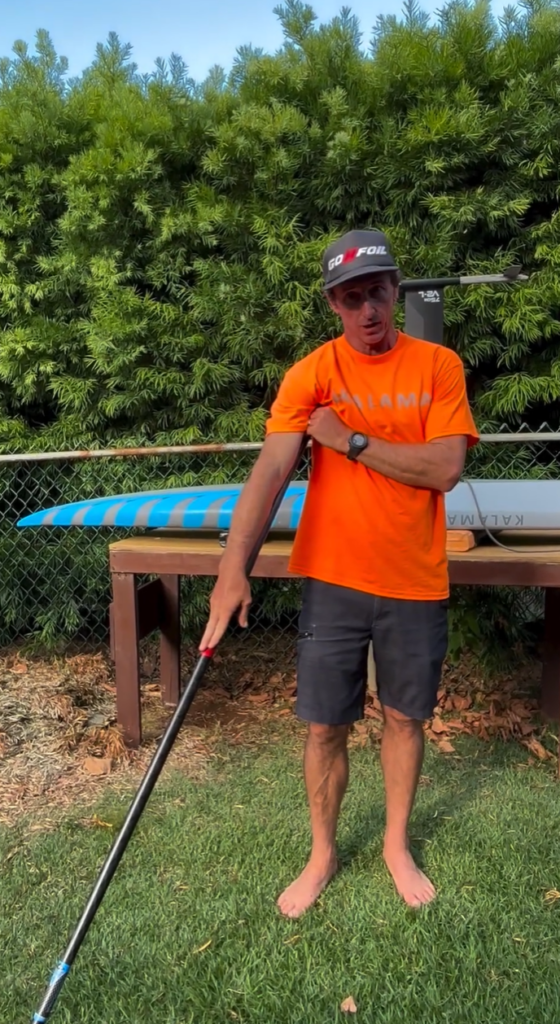
Paddle should be vertical 90 degrees to the water. Your top hand should be slightly bent and in front of your forehead at the beginning phase of the stroke while your bottom hand should be completely straight. The grip on your paddle should be very light with only your thumb, main point finger and middle finger wrapped around while your ring finger and pinkie will be loose to avoid injury to your elbow tendons from over gripping your paddle.

4.5. Other workouts
Longboards or Carver style skateboards can be a great way to build your core strength and balance.

5. Reading the Bumps
5.1. The lines to take
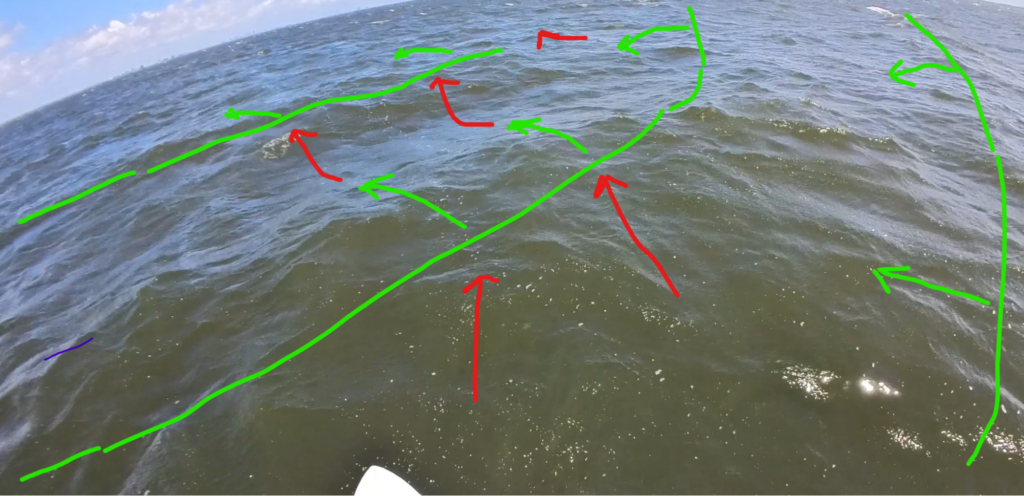
The ocean and wind bump energy is slightly different from your surf break. Bumps are hardly ever lined up perfectly which make keeping on foil challenging but also fun. The speed of your foil (given by its profile and size) is an important factor. Provided that your foil rides at the speed of the bumps, you want to aim across the wave to either side until you spot another developing spot that may have more energy. It is important to stay away from the back of the wave in front of you. The back of the wave or “uphill” is exactly that and it will make your foil lose speed. Keeping your speed up is the king in downwind so we strive to find places that will help us gain speed that we can then use to overcome areas of bumps with low or no energy. It is important to know that running into an uphill can happen even during your paddle up. Sometimes bumps are too close to each other and you must turn across the bumps immediately and keep turning side to side. This usually happens during low energy conditions or if you are using too small of a foil size (“Under-foiled”). Stay out of the red zone uphills and find more green zone downhills.

5.2. How to go slow and how to peel off
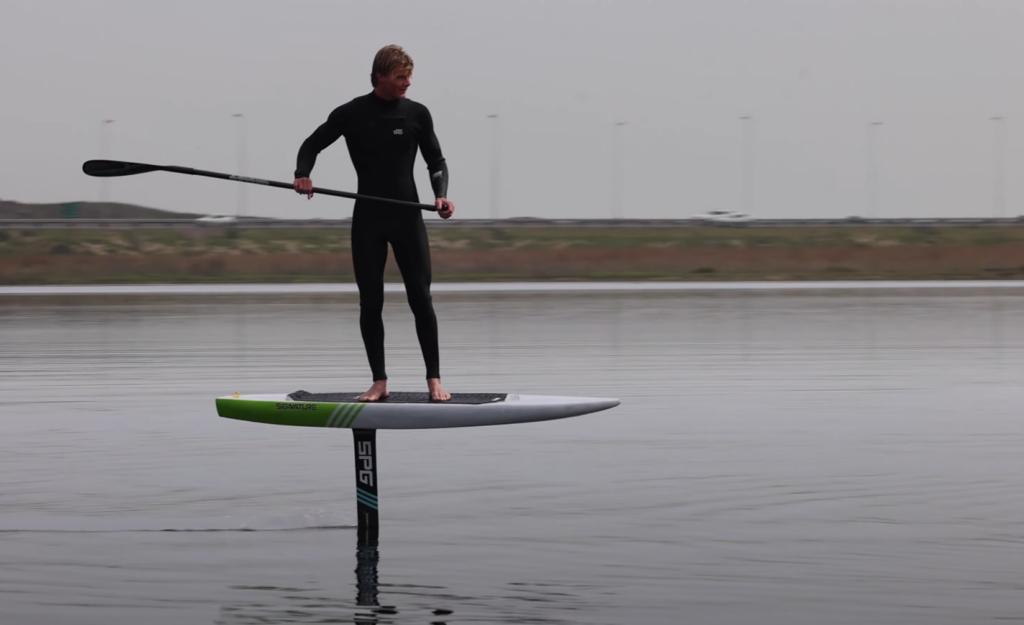
Going slow is a very important skill. Learn the stall speed of your foil with your hand wing and remember to stand tall with straight legs when doing this test. Try adding a small pump with your legs to prevent a complete drop of the foil through the water. This will mimic the low energy situation and develop important skills to trust the glide of your foil. Standing tall with straight legs in the correct position helps to keep your board and foil in optimal horizontal position to glide. In turn, the glide will give you the necessary time to maneuver your foil slowly and efficiently. Good decisions with enough time are always better than random pumpfest forward to save you from coming off foil.
Peeling off faster is another important method to stay with the speed of the bumps. While you still have good speed and feel comfortable, you must think that the bump will eventually run out of energy or simply disappear. Act ahead and use the speed to move you one bump behind. With enough speed you will turn back into the next bump. This will soon develop a pattern that you can follow along your entire run. Know that pointing away from the shore will generally give you more energy as bumps are spaced out further apart. Going towards the shore can bust your speed quickly. Use this speed to peel off a couple bumps to continue in the good direction of your run.
See the master of glide in this video: https://youtu.be/INQdGodk6SQ?si=msT4OJBt9f8DzuxR
5.3. World is your oyster rule
This section is to just reiterate that with enough speed your foil can turn and go the full 180 degrees downwind and sometimes even slightly upwind. Many beginners make the mistake of only turning within a much smaller radius than 180 degrees. This leads to running into the uphills more frequently and results in pumping hard with your legs to overcome such low energy areas.
6. Efficient pumping and being efficient without pumping
In low energy conditions, your foil loses speed and gets lower on the mast and starts to sink until you touch down with your board. There are two goals with pumping.Increase your speed and maintain your speed. In bigger conditions, you can just tap-tap-tap your foil to quickly gain height which will carry you over to another spot where you pickup more energy. Some riders call this type of pump “ollie up”. This type of pump comes with the high risk of stalling your foil as it prevents you from increasing your speed. Tap-tap-tap pump is sending your foil nose up but at the cost of your speed and will likely result in a complete stall unless you quickly pickup some ocean energy from the next bump.
In small conditions or flat water (no energy) conditions, you need to learn how to increase your speed to regain the glide of your foil on your own. The pump is like the “ollie up” but requires you to push down sharply rather than un-weighing yourself. Your feet position, knee forward of your angles, hip placement and forward projection are all combined here to achieve this speed increase. Kawika Drummond explains the speed gaining pump in his video Kawika Drummond. Practicing this pump with your foil drive or dock starting into flat water is the only way to learn how to properly increase your speed without relying on any energy in the ocean.
6.1. How to pump 101 surf foiling
Video – How to pump 101 surf foiling

- Eye up, look forward
- Knees over your ankles
- Hips over your front knee
- Shoulder over or forward of your hips
- Head in front of your knees
- Hand do not move up but down and back from your hips
- Start from bent knees and project your body up and forward
- Avoid your hips/butt going back behind your front foot at all costs
6.2. Bad body position example with hips far back behind your feet as well as your upper body


6.3. Better stance with body leaning past your knees
Learning from the best riders in this year’s M2O race: Edo’s hips are slightly forward of his feet and upper body is a perfect example of leaning forward of his knees.


